| [Standard query | Lemma query | Browse a file | Word lookup | Scan keywords/titles | Explore genre labels | Frequency lists | User settings | Query history | Saved queries | Create/Edit subcorpora | Post-query options ] |
Create/Edit subcorpora |
The Create/Edit subcorpora feature can be used to compile user-defined sets of BNC text files. With the help of such subcorpora it is possible to restrict searches in a more flexible way than via the written or spoken text restrictions in a Standard query.
A subcorpus can be created via one of the following options from the drop-down menu:
This page gives instructions for methods 3 to 5 only. For help with the other methods, please click the relevant links above. Note that methods 1-4 can also be accessed from the BNCweb main page menu.
Creating a Subcorpus via written or spoken metatextual categories |
If you choose "Written metatextual categories" or "Spoken metatextual categories" via the drop-down menu on the Create/edit subcorpora page, you can define a subcorpus on the basis of various BNC categorisations.
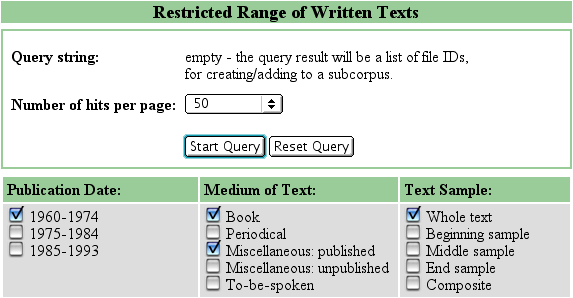
Step 1: The following (truncated) screenshot shows some options for 'Written metatextual categories':

Choose your criteria by checking the relevant boxes, then press Start Query. The above screenshot shows the following selections: "Publication Date: 1960-1974" AND "Medium of Text: Book" OR "Medium of Text: Miscellaneous: published" AND "Text Sample: Whole text".
(Note: If you clicked on 'Written texts' or 'Spoken texts' under the 'Standard Queries' menu on the BNCweb main page, you can leave the query string box empty and only select metatextual categories. The query result can be used to create a subcorpus in the same way as given in the instructions here.)
Step 2: The following screenshot shows the query result for the categories selected under Step 1:

You can now click on the file IDs to find out more information about the texts and include them one by one by checking the corresponding boxes on the right, or choose to include all the files displayed on this page. In the above screenshot, the option to "include all files on this page in subcorpus" has been checked - both texts will therefore be included in a New subcorpus when the 'Add' button in the top right corner is pressed. You can also choose to add the files to an existing subcorpus by changing the selection in the drop-down menu.
HINT: If your query result has more solutions than are displayed on one page, BNCweb currently doesn't offer the possibility to include all the files into a new subcorpus in one single step. This limitation can be circumvented by setting the Number of hits per page option to a bigger number (e.g. 1000).
For spoken texts, if your metatextual categories include speaker-based restrictions (e.g. "Age of Speaker" or "Sex of Speaker"), speakers who don't correspond to your selected criteria will be shown in grey. In the screenshot below, the category "Age of Speaker: 35-44" was checked:

PLEASE NOTE that if you select this file to be included in your subcorpus, the whole file will be included and not only those utterances by speakers who match your selection. To run queries restricted by speaker-based criteria, you will need to use the Spoken texts option under Standard Queries on the BNCweb main page left menu. These speaker-based criteria will have to re-selected for each new query (unless you use the 'Back' button on your browser to navigate backwards to change your query string).
Creating a Subcorpus by entering BNC file IDs |
Use this option to directly enter a list of filenames
(perhaps obtained from using the Excel spreadsheet version of the BNC
Index). This is useful when you already have a prepared list of
filenames that you want to use to define a subcorpus.
Step 1: First, give your intended subcorpus a name (e.g. "PersonalSubcorpus").
In the large box, enter the 3-character BNC filenames you want to include in this subcorpus, using commas, spaces or carriage returns to separate individual filenames.
Then press 'Create Subcorpus'.
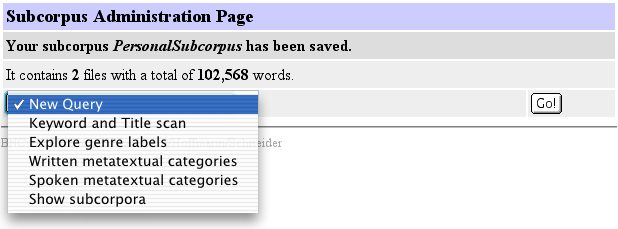
Step 2: Your
subcorpus will be saved and you will see a screen like the following (the
drop-down menu has been activated below in order to display the available options):

You are now ready to perform a Subcorpus query with your newly created subcorpus.
Editing previously defined subcorpora |
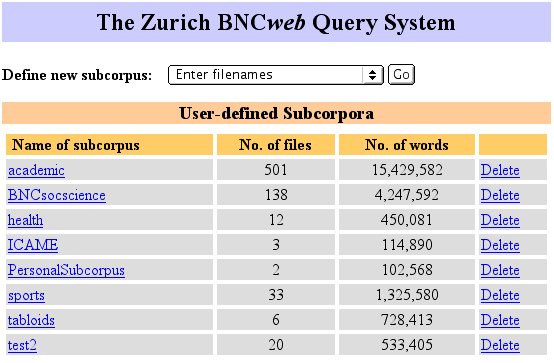
If you have previously defined subcorpora, they will be listed in the Create/Edit subcorpora page as shown in the screenshot below.

If you have not previously created any subcorpora, you will simply see a screen asking if you want to define a new subcorpus.
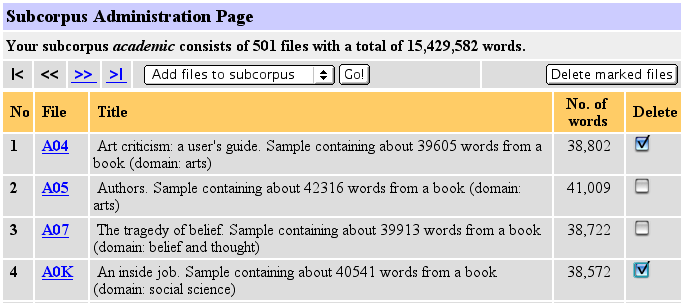
A subcorpus can be deleted by clicking on the relevant link in the fourth column - this action cannot be undone. Clicking on the name of a subcorpus will produce a list of the files it contains. It is possible to delete or add individual files.

There is no upper limit to the number of files a subcorpus can contain.
| [Standard query | Lemma query | Browse a file | Word lookup | Scan keywords/titles | Explore genre labels | Frequency lists | User settings | Query history | Saved queries | Create/Edit subcorpora | Post-query options ] |